Saturday 27 July 2013

CHERRY PIE


Click here for the 'Seeds of Eaden' seed shop

Nothing can beat the smell of home made cherry pie, and its totally delicious served warm with a scoop of vanilla ice ream. If you are lucky enough to have a cherry tree in your garden or a farm shop nearby then  you simply must make this pie with fresh cherries that are in season.  However, don’t despair if you haven't as this recipe also works well with preserved cherries too.


Ingredients

Short crust pastry

250g plain flour
50 oz/140 g butter
3 tablespoon water
2 eggs 
Pinch salt.
2 tablespoons caster sugar 

Pie filling
2.2 lb / 1 kg fresh cherries
4 oz black cherry jam
2 tsp arrowroot
75 ml water

Method

Remove the stones and stalks from the cherries. Heat the jam and water in a pan gently until the jam bubbles, Add the arrowroot and continue to stir until mixture thickens. Add the cherries to the mixture and stir until they are covered. Allow to cool.

To make the pastry mix together the flour, butter and sugar together in either a bowl or a food processor.  Beat a egg in a bowl and along with the water gradually add this to the dry ingredients.  Mix until it comes together as a dough, adding more water a tablespoon at a time if the mixture is too dry. Wrap the pastry ball in cling film and allow to chill in the fridge for 30 minutes.

Divide the pastry into two. Roll out the first piece of pastry and line a 10" pie dish. Transfer the cherry filling into the pie dish. Roll out the second piece of pastry and place over the top of the pie dish. Press firmly around the edges to join the seam and trim, placing a hole in the centre of the pie to allow steam to escape. Glaze with the egg and sprinkle with sugar.

Cook in an oven set to 200C/400F for 40 minutes or until the pie is golden brown. Allow to cool for 1 hour and serve with vanilla ice-cream.

For related articles click onto:
Banana loaf recipes

Tuesday 23 July 2013

HOW TO PROPAGATE PLANTS FROM SEED


Click here for the 'Seeds of Eaden' seed shop

You can grow many plants successfully from seed, either collected by yourself from the flowers of existing seeds or using shop bought packet seeds.  The main advantage of growing plants from seed is the low cost and high yield, and of course the satisfaction of growing your own plants from seed.  You can also source seeds of exotic or hard to find varieties that are just not readily available to buy as plants.

Unlike asexual propagation techniques such as cuttings, grafting and division, plants grown from seed will differ from the parent plant.  Growing plants from seed will lead to variation of plants that may differ in flower colour, vigour, habit and other characteristics.  

You can give your plants a head start by sowing seedlings indoors or in a heated greenhouse around mid march. They will need to be protected from frost, and temperatures at night should not fall below 10 degrees Celsius. Depending on variety and size of your seed you can sow your seeds direct into the soil of your bed, or in pots or seed trays. 


Sowing seed indoors

When sowing in containers use John Innes 'seed and potting' compost. Sow small seeds in seed trays and lightly cover with a layer of compost.  Sow larger seeds in larger pots and place three seeds in each pot.  As a general guide a 1.5 cm seed will require a 15 cm pot. You can use any container as long as it has adequate drainage (punch some holes in the bottom if it doesn't) . Don’t forget to label the pots!

Water lightly and place in a propagator, or cover with a sheet of glass/clear plastic bag/half plastic bottle.  This will ensure that the seeds are kept moist until germination, after which this protection can be removed. Seedlings are at risk from fungal rots due to the damp conditions, so good ventilation is important. 

The seedlings will require high levels of light, around 12-16 hours of sunlight a day. A south facing window sill or shelf in glass house is ideal, although they will require the seed tray to be turned round daily to prevent the seedlings from permanently leaning.  Keep the soil moist (but not waterlogged) until the seeds germinate, usually between 3 days to 3 weeks depending on plant variety.

You may wish to prick out some varieties of seedlings and transplant to larger pots. These pots can be filled with a standard potting compost or John Innes potting compost no.1 or 2.  Wait until the seedlings have produced their second set of leaves and then lift the seedling out of the seed tray using a pencil/dibber.  Hold onto the largest leaf and lift out the root ball carefully. Plant the seedling in the pot or in its final position and water gently.

The seedlings are ready to plant outside when the threat of frost is over, usually during May. Ensure you harden off the seedlings before planting outside by bringing them outside during the day and back in at night for a few weeks, or placing them in a cold frame.


Sowing seed outdoors

You can sow seed direct into the soil from mid May onwards, when the soil has warmed up and the threat of frost has passed.  You could sow your seeds a month or two earlier if you protect your seedlings by using a cloche.

Prepare your soil prior to planting, incorporating a general fertiliser or organic compost as required for your variety of seed.  It can often be an advantage to plant seeds in thin drills a few centimeters deep.  This allows for easier identification of the seedlings and differentiates them from other plants and weeds, which should be removed.  Water well especially during dry spells and stake any tall plants as necessary.


For related articles click onto:
Feeding plants
Herbaceous borders
How to Grow Agave from Seed
How to grow geraniums from seed
How to grow lavender
How to grow seeds indoors
How to grow squash
How to grow thyme
How to plant Dahlia tubers
How to propagate using division
How to propagate by grafting
How to propagate from seed
How to take a stem cutting
How to propagate from root cuttings
Green manure: Broad beans
Growing herbs
Growing herbs in pots
Ladybirds
Ladybird facts
Plant names
Plants for free
Plants for Autumn
Pruning trees and hedges
Rose pest and diseases
What is the difference between a rambling and climbing rose?
What is the difference between a rhododendron and an azalea?
What is green manure?

Tuesday 16 July 2013

HOW TO PROPAGATE FROM ROOT CUTTINGS


Click here for the 'Seeds of Eaden' seed shop


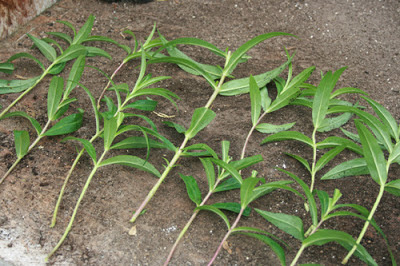
You can propagate many plants by taking root cuttings. The advantage of taking root cuttings is that you can produce large numbers of plants relatively simply.  There is no need for propagators or any fancy kit, you can just place them outside in a pot and wait for the plant to do its thing.

Plants produced from root cuttings will usually be identical to the parent plant, with the exception of grafted plants that will take on the properties of the grafted root stock.  You can use this method of propagation for trees, shrubs and many perennials.

Taking root cuttings

Root cuttings should be taken when plants are dormant, between November and February before the plant breaks out into bud.  This is because the energy stored in the roots is absorbed by the plant during the growing season and makes roots cuttings less effective.  By carrying out this operation at this time you will minimises stress on the parent plant and use the stored energy in the roots.

Before you take your cutting ensure that you select a healthy, disease free parent plant. You can expose the roots of perennial and smaller plants by digging them up in their entirety.  For larger plants such as woody shrubs you can dig down on one side to expose the roots in situ.  Select healthy roots that are about pencil sized, avoiding old and woody ones.  For perennial plants select the large fleshy roots, in fact the thicker the better.

With sharp secateurs make a straight cut through the root closest to the parent plant.  Follow the root down from this cut make a second diagonal cut towards the end of the root. The angle of the cut helps to orientate the root when you come to pot the root cutting up.  This is important as your cuttings will not develop if they are planted upside down. 

Do not remove more than 30% of the roots of the parent plant or you will remove too much of the plants stored energy. Replant or cover the roots of the parent plant with soil afterwards and water well to settle the roots back into the soil.

Cut the root into sections 8-15 cm long, maintaining the straight top and slanted bottom angles of each cutting.  Keep the width of each root about pencil sized as this will ensure that there is enough energy in each cutting to produce roots and shoots.

You can plant your root cuttings direct into the soil or in deep pots.  Water the soil well before planting so that it is moist. Dust the bottom of the root cuttings with powdered sulphur to help prevent the roots from rotting.  Place some sand in the bottom of the planting hole and plant horizontally at a depth of 2-3 cm below the soil level.  Cover with a 1 cm layer of coarse sand or grit and water sparingly, only when the soil becomes dry.

New shoots should start to form in about a month.  Feed with a weak solution of liquid fertiliser until plants are established when you can transfer to a larger pot or plant into the garden.


For related articles click onto:


Friday 12 July 2013

CHICKEN RISOTTO RECIPE


Photo care of tumblr.com

Click here for the 'Seeds of Eaden' seed shop


Risotto is so quick to make.  Within 20 minutes you can have a fantastic meal ready at the table. 

Serves 4

Photo care of  laurens-kitchen.com

Ingredients

300 g Arborio rice
350 g chicken
1000 ml chicken stock
1 tablespoon olive oil
1 large onion
2 peppers
200 g mushrooms
200 g frozen garden peas
Salt and ground black pepper to season
2 teaspoon turmeric


Method

Dice the chicken into small pieces. Finely chop the onion, pepper and mushrooms.  

Heat the olive oil in a frying pan and gently fry the chicken, onion, peppers until soft and translucent.  Add the mushrooms.


Stir in the rice, coating it with the mixture, and add half of the stock.  Stir well until the rice has absorbed most of the mixture.

Add the remaining stock, then the peas, turmeric, salt and pepper. Stir well and allow to simmer gently./2011/01/risotto-with-tomato-and-mascarpone.html

When the liquid has almost been absorbed test the rice to ensure it is cooked al dente. Add more boiled water and cook for longer if required.

Serve with grated Parmesan.

Monday 8 July 2013

HOW TO TAKE A STEM CUTTING

Photo care of ruralgardener.co.uk
Click here for the 'Seeds of Eaden' seed shop


Stem cuttings are easy way to increase the plants you have within your garden for very little expense.  You can take cuttings from your existing plants to increase the numbers within your garden or to replace tired plants.  Of course, you can also take cuttings of different plants from your friends’ gardens or elsewhere to add variety to your garden. 

Phot care of  lovelygreens.com
Unlike plants grown from seed, stem cuttings will always be clones from the parent plant.  Hence they will exhibit identical habits and characteristics. This makes cutting especially effective where continuity amongst a group of plants is important, such as hedging or block planting. It is also useful to take cuttings of your more tender plants in case they do not make it through the winter.

Taking stem cuttings is a cheap way to increase your planting stock if you have a little patience for the plants to grow in size. Once you have developed the skills to propagate from cuttings then you can easily develop new plants at a fraction of the cost from the garden centre. 

How to take a stem cutting 

First of all ensure that the parent plant you are going to take a cutting from is in perfect health.  The child plant will be a clone and so will exhibit all the traits of its parent.

Photo care of gardenseeker.com
Take stem cuttings in late spring/early summer when plants are growing vigorously. This means that they will quickly develop roots and establish fast during the rest of the season. It is best to take cuttings in early morning when the plant is filled with water from the evening.  

You need to select a stem from the new growth as this will root easier. Avoid flower buds as they will take the energy required to produce roots, although you can remove them if necessary. There is no need to use a rooting compound to facilitate root growth.

Cut a piece of stem 10 – 15 cm long, ideally just above a leaf node as roots usually form at a node. Remove the leaves from the lower third of the stem. If you are out place the cuttings in a container of water until you are ready to plant then up later that day. Take more cuttings than you need to allow for the fact that some will fail to grow.

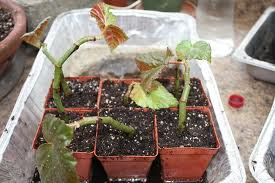
Fill a 9 cm pot with John Inness seed and potting compost and water well. Make a hole your pot with a pencil or dibber and place the lower end of the cutting in the soil and gently firm.  You can place three cuttings around the edge of each pot. Place in a partially shaded area either indoors or outdoors.  Do not position in full sunlight as too much sun and heat will be detrimental.

Photo care of http://allthedirtongardening.blogspot.co.uk
When growing cuttings outdoors you may wish to place your cuttings in a cold frame or walled area to protect against drying winds.  If you are propagating indoors place the pot in a propagator or cover with a plastic bag or similar to prevent moisture loss (I use half a coke bottle over mine). 

Water when the soil is just becoming dry, but ensure it is not waterlogged or the cutting will be prone to dampening off and rot.  Your cutting should develop roots with a few weeks.  A key indicator of success is that your cutting looks fresh and there is a little resistance when gently pulled.


For related articles click onto:

Saturday 6 July 2013

HOW TO PROPAGATE USING DIVISION

Photo care of  grow.ars-informatica.ca

Click here for the 'Seeds of Eaden' seed shop


Division is as simple as it sounds.  You make new plants by simply dividing the parent plant into smaller parts.  The size of the parent plant determines how many plants you will get, but usually three or four new plants can be achieved.

Photo care of msucares.com
Division works on plants that have multiple stems (crown) as each new plant has enough stems and roots to create a larger plant.  Division is used on clump forming plants and works particularly well on herbaceous plants, which can get old and woody after three years. It does not work on single stemmed plants.

Plants propagated by division will always be clones of the parent plant and so will exhibit identical habits and characteristics. This can be useful when filling out borders, increasing your plant stock or replacing tired plants.

How to propagate using division 

There are several ways that you can divide your plants but all are carried out at the same time; early spring or late autumn.  This is because the plant is dormant during this period and the roots are inactive. 

Photo care of gardening.about.com
First of all ensure that the parent plant you are going to divide is in perfect health.  The child plant will be a clone and so will exhibit all the traits of its parent.  Any low vigour or pests and diseases will be passed on to your new plants.

Dig up the parent plant from the soil in one clump. With a spade cut downwards to separate into two pieces.  You can further cut these pieces in half, depending on the size of your parent plant.  Remove any dead, diseased or old plant material from the centre of the plant. 

Depending on the type and size of plant you are dividing you may wish instead to use two forks back to back in the centre of the plant and lever the clump apart.  This ensures that you do not sever any roots or the main crown which may happen when using the spade. You can then pull apart the clump with your hands. On tough rooted plants you may find that an old knife works well too.

The key to successful division is to ensure that each section you divide has a good crown and root ball, as the new plant will establish from this genetic material.  Ensure each division has at least two or three sprouts in its crown.

Photo care of plantpreview.blogspot.co.uk
If you do not want to disturb or reduce the parent plant too much you can leave it in situ and remove a few divisions from the outside of the plant.  Scrape back the soil from the edge of the plant to select the division you want.  Take a spade and cut a square around the part to be divided in order to sever the plant roots.  Lift the division and replant in its new position.

You can replant each division back into your garden or plant up in pots for growing on. Ensure that you plant them back at the same soil level in the bed as they were originally.  Water well after planting and regularly during dry spells to ensure that the plants establish.


For related articles click onto:

Wednesday 3 July 2013

HOW TO GROW THYME (Thymus vulgaris)

Photo care of gardenseeker.com

Click here for the 'Seeds of Eaden' seed shop


When growing herbs in your garden you are very likely to grow thyme because it is such a versatile herb which requires very little maintained.  You can grow thyme in your herb garden, as a ground cover plant, in your herbaceous borders, or even as an alternative to a lawn.

Photo care of groworganic.com
Thyme is one of  the most poplar culinary herbs, used to add flavour to a variety of dishes. It has a spicy, clove like flavour which complements beef, poultry, pork, lamb and fish dishes. Lemon thyme has a milder, lemony flavour and is excellent with fish and chicken.

The flowers, leaves, and oil are used as medicine. It has mild antiseptic, antispasmodic, tonic and carminative qualities and is often used to ease sore throats and coughs.

Thyme is a perennial herb native to the Mediterranean. This mound forming plant can reach up to 30cm high, but there are many lower, carpet forming varieties. Thyme has compact, aromatic leaves and a profusion of flowers that are irresistible to insects. When grown between paving stones the scent of its highly aromatic leaves is intensified when trodden on.

Propagation 

You can propagate thyme from seed, root division and cuttings. However growing from seed or cuttings can take a long time to grow into a viable plant whilst division can produce a good sized plant in just a few months.

Photos care of tendingmygarden.com
You can divide thyme in the early spring.  Dig up a healthy plant at least three years old and remove as much soil from the roots as possible. Gently tear the plant apart to form three or four pieces, each with sufficient roots and foliage to sustain the new plant. Plant back in the soil and water thoroughly.  You can harvest the new plants from late summer onwards.

Seed can be sown in pots from March onwards.  Keep on a warm position on a sunny windowsill or greenhouse and keep the compost moist.  Thin the seedlings a week after germination to leave the 2 strongest seedlings. When the plants are 10cm and show their true leaves you can harden off the plants before you can plant in their final positions.

Alternatively you can take a cutting 10 cm long and strip off the lower third leaves.  Place up to three cuttings in a 9 cm pot and water gently.  Cover with a plastic bag or place in a propagator (I use a old coke bottle cut in half).  Water when soil is just turning dry to avoid water logging. Within a few weeks your cutting should be developing roots and will be ready to plant out when a good root system has established.


Maintenance 

Plant out your thyme plants at 30cm spacing's in a well-drained soil in full sunlight. Water the plants during very dry conditions. Do not overfeed your thyme or it will become leggy and lose its flavour although they will benefit from application of a mulch of organic matter in the autumn. 

Tuesday 2 July 2013

PLANTS FOR AUTUMN


.
When deciding on which plants to buy for autumn effect, the overriding factor for most people is not how good they are going to look, its how they look now that’s important. And to be fair who can blame you, especially when plant retailers are constantly barraging you with nursery fresh specimens, resplendent in seasonal (and some times non-seasonal) blooms on a week to week basis. The truth is that flowers sell plants and every nurseryman worth his salt one knows it.

However flowers are often short lived and by buying solely on face value you can be missing out on some of the ‘slower burning’ plants that have changing and often just as exciting ornamental effect occurring at differing times throughout the year. With a handful of background knowledge mixed together with a splash of forward thinking you can create some fantastic displays of seasonal colour that are as vivid and spectacular as any flower.


Berberis julianae changing to winter colour
The key is in the seasons, and as they change our plants requirements will be changing too and no more so than in the way they make preparations for the on coming depths of winter.

Watch carefully as evergreens can change before your very eyes drawing on brightly coloured pigmentation that helps to protect its foliage from cold damage.

Perhaps the best examples of this are cultivars of Nandina, Cryptomeria, and Berberis - in particular the vicious, yet stunning looking julianae variety.

Don’t make the mistake of ignoring deciduous plants just because their displays are shorter lived. Not only are their colours just as vibrant, and in many cases more so, their autumn mortally can make them all the more precious. Perhaps more importantly you can find a far greater selection and range of colour.


Acer palmatum species
If its reds you want, you can’t be without the rich, fiery brushstrokes of the Euonymus alatus, Hydrangea quercifolia and Acer palmatum ‘Osakazuki’. If you are looking for something a little larger then nothing will beat the rich scarlet to almost deep purple autumn foliage of the superb Liquidambar styraciflua.

For climbers choose the bold Vitis coignetiae or anything from the Parthenocissus family as all of these will give a great show, although my personal favorite is the more succulently leaved ‘Henryana’ variety.


Cornus alba ‘Kesselringii'
Although rarely considered when choosing a plant for the garden, good bark effect has the ability to bring an autumn/winter garden to life. Not just from maturing trees but from what would normally be considered to be humble shrubs.

Perhaps the best ranges of colour from a single species can be found within the Cornus family, especially as it includes one of the few plants to give a near black colouration - Cornus alba ‘Kesselringii'. If you only have space for just the one plant then consider Cornus sanguinea ‘Midwinter Fire’ as, rather greedily, it tries to get almost all the colours onto one plant making it one of the most spectacular choice for the winter garden. To get the most out of your Cornus cut back, almost to ground level, each year in early spring.
.
AUTUMN EFFECT - Flowers

Colchicum varieties - Autumn crocus
Clematis tangutica – orange peel climber
Asters - Michaelmas Daisies
Mahonia
Hamamelis
Physalis alkekengi
Erica carnea (My favourite is ‘Myreton Ruby’)
Sarcococca – christman or sweet box
Autumn Effect – Bark
Betula youngii – snow white bark
Cornus
Acer grisium
Eucalyptus niphophila
Prunus serrula

AUTUMN EFFECT - Foliage

Acer ‘Ozacisuki’
Euonymus europeus and elata
Fothergilla
Liquidambar styraciflua
Hamamelis
Vitis coignetiae
Hydrangea quercifolia

AUTUMN EFFECT - Berries

Rose hips
Pyracanthus
Callicarpa bodinieri ‘Profusion’
Aucuba
Skimmia
Arbutus unedo
Hippophae rhamnoides
Ilex varieties – holly female only