Saturday 29 December 2012

WHAT IS THE DIFFERENCE BETWEEN A SOUP AND A BROTH


Click here for the 'Seeds of Eaden' seed shop

I was asked the other day ‘What is the difference between a soup and a broth?’  Good question.  Simple, surely a broth is a thin, unenhanced soup, isnt’t it?  But then what is the difference between a stock and a broth? Or a stew? Or a bisque?  Even a Chowder, Consomme or a Puree?

Soup
A soup is typically a combination of vegetables or  meats cooked in liquid. They are made up of a thin water, juice or milk based broth. They are considered a starter not a main course. They can be cooked or uncooked and served hot or cold.  Soups are cooked at high temperatures and rely on herbs, spices and garnishes to create their deep flavours.

Bisque
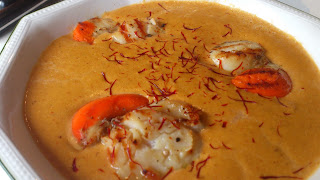
Bisque is a thick, creamy soup. It is traditionally made from pureed shell fish. All parts of the shell fish are used, even the shells, and ground into a thick paste and added back to the bisque.

Chowder
A Chowder is a soup that is thickened with flour. Often its is seafood based such as clam chowder, but can consist of vegetables. 

Broth
A broth is an un-thickened liquid food in which meat, fish, grains or vegetables have been simmered, and is eaten as a finished dish.  It is often the starting point for other liquids such as soups or gravies. Broths differ from stocks in that they are made from finer foods and are richer and more nourishing than a stock.

Stews
Stews are thicker than soups.  They are often thickened with potatoes and are served hot. Ingredients in a stew are chunkier than a soup, and the liquid in a stew is more of a gravy than a broth.  Stews are cooked over a low heat for a long time. Generally stews contain less liquid than soups.


Consomme
A consommé is a broth that has been adapted.  Often egg whites are added to the broth and simmered gently to coagulate the sediment, which rises to the top.  This sediment is skimmed off the surface and a clear, pale liquid remains.


Puree
A purée is a food that has been mashed, pressed and strained into a soft paste. They are often made up from vegetables of fruit. They can resemble soups or gravies but are separated merely a less complex cooking process and by the lack of additional ingredients.

Monday 17 December 2012

GINGERBREAD CHRISTMAS TREE DECORATIONS


Click here for the 'Seeds of Eaden' seed shop

Gingerbread is quick and easy to make, making it ideal for children to have a go too.  Why limit yourself to gingerbread men and women when you can make gingerbread animals, Christmas tree decorations or gingerbread houses.  

Makes  12 decorations

Ingredients

200g soft brown sugar
200g butter
500g self-raising flour
4 tablespoon golden syrup
1 tablespoon ground ginger
1 teaspoon mixed spice
½ teaspoon nutmeg

To decorate:
100g Royal icing
Ribbon


Method

Pre-heat oven to 180C/gas mark 4.

Gently melt the butter, sugar and golden syrup in a large pan. 

Sift into a bowl the flour, ginger, mixed spice, and nutmeg. Add the butter mixture to the dry ingredients and mix together with a wooden spoon to form a stiff dough.

Line two baking sheets with baking paper.  Lightly dust the work surface with flour and roll out the dough until it is 5 mm thick.  Using a large snowflake template cut out the gingerbread.  Alternatively use Christmas tree, stocking, reindeer or snowman templates,   

Make a hole in the top centre with a skewer for hanging on the tree.  Transfer to the baking sheets. 

Bake for 15-20 minutes until lightly browned.  Allow to cool on the baking sheet for 10 minutes, and then transfer to a wire rack to cool completely.

Decorate with piped icing and hang with ribbon on the tree.


Saturday 15 December 2012

GINGER BREAD HOUSE


Click here for the 'Seeds of Eaden' seed shop

This cake is an ideal centrepiece on any table, and can be customised easily.  You can be  as creative as you like with the decoration, and even add gingerbread men and women into the scene.  The sky's the limit.

Serves 12

Ingredients

200g soft brown sugar
200g butter
500g self-raising flour
4 tablespoon golden syrup
1 tablespoon ground ginger
1 teaspoon mixed spice
½ teaspoon nutmeg
450g royal icing sugar
75ml water

To decorate:
Desiccated coconut
4 tubes of Smarties
3 pack of Jelly tots

Method

Pre-heat oven to 180C/gas mark 4. Line two baking sheets with baking paper.

Gently melt the butter, sugar and golden syrup in a large pan. 

Sift into a bowl the flour, ginger, mixed spice, and nutmeg. Add the butter mixture to the dry ingredients and mix together with a wooden spoon to form a stiff dough.

Lightly dust the work surface with flour and roll out the dough until it is 5 mm thick.  Using a house template cut out the house pieces and transfer to the baking sheets.  Bake for 15-20 minutes until lightly browned.  Allow to cool on the baking sheet for 10 minutes, and then transfer to a wire rack to cool completely.

To assemble the house you will need to use the royal icing to act as glue. Place the royal icing sugar in a bowl and add the water.  Mix together to form a thick paste. Place the icing mixture into a piping bag.

Pipe the strips of icing onto the edges of the gingerbread pieces.  One by one stick the wall pieces together.  Support the house whilst you build it by placing cans next to each wall. Allow the icing to dry for at least 1 hour.

Ice along the edges of the roof and attach to the gingerbread house, supporting the structure with cans and books until the structure is dry.

Tuesday 11 December 2012

POINSETTIA CARE


Click here for the 'Seeds of Eaden' seed shop

Poinsettias are traditional Christmas plants and belong to the plant group Euphorbia Pulcherrima. They are available as traditional red flowering, but also come in pink or white.  The ‘flowers’ are actually bracts (modified leaves) and the flowers are the inconspicuous yellow centres that lie within the bracts.

There are sixty-five million poinsettias bought worldwide each year, but too often by New Year all that is remaining in the pot are a few sticks and some sorry looking leaves.  But you can make your poinsettia  last the festive season, and into spring and next winter, if you care for them successfully.

Poinsettias hate draughts and the cold.  All too often they are damaged even before they are displayed in your home, either by being sold in by cold supermarket doors or on the way home.   Select a poinsettia that is in a sheltered position in the shop, and wrap it up before taking it out.  Ensure you choose a healthy plant free from pest and diseases and one that has plenty of leaves and buds.

Give careful consideration to the location of the plant within your home.  They require a warm and light position, but need to avoid being placed directly next to radiators and windows.  Keep the temperature constant between 15C-22C.

Water only when the compost feels dry, but remember poinsettia can be thirsty plants.  Maintain a high humidity around the plants, so either mist occasionally or alternatively fill a saucer half with gravel and water and place near to the plant.  Feed once a month with a tomato food.

A few months after Christmas the plants will start to fade.  In order to stay bright poinsettias require equal amounts of light and dark, which is a challenge when the days start to get longer again. Move the plant to a cool, dark position indoors and water as weekly as required.

Often poinsettias get too leggy to use again the following season so you  can take new cuttings from  the plant during the summer.  However, with effort, you can nurse the parent through until the following Christmas.

Re-pot your poinsettia in April into a slightly bigger pot using compost consisting of 3 parts John Innes 3 and 1 part grit.  Cut the plant down to 10cm high. 

Once the danger of frost has passed and the ground has warmed up the plant can be placed outside.  Select a bright, sunny spot and sink the pot into the ground.  Water as necessary.

Bring the plant back into the house during September before it gets too cold. Place in a light, sunny position and feed with a low nitrogen feed every three weeks.

During October and November  you need to mimic short days and long nights in order to promote bushing on the plants. Place in a dark room during the evening, ensuring no light shines on the plant, and then place back in a sunny position during the day. The plant should burst into life during December.

Friday 7 December 2012

THE SEAHORSE


Click here for the 'Seeds of Eaden' seed shop

The seahorse is a graceful inhabitant of the warmer seas and look like a piece from a chess kit. An oddity among ocean life, the seahorse was at one time thought to be a mythological animal.

The seahorse is a member of the pipefish family, belonging to the order Gasterosteiformes, family Syngnathidae and species Hippocampus.  There are 35 species ranging in size from a 2.5 cm pigmy variety to the giant 35 cm Eastern Pacific seahorse.

Seahorses are usually found in warm, shallow water amongst sea grass beds.  While some species prefer muddy or sandy areas, others can be found hanging onto corals, sponges, mangrove roots or even wrapped around the mooring ropes of boats.
In all cases seahorses will be found where there is deep, fast water channel nearby to provide a good supply of their main food, plankton.  

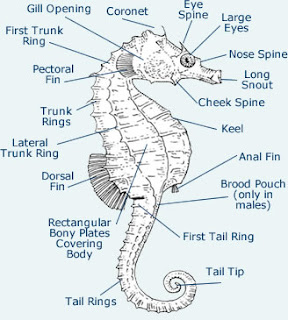
Seahorses are poor swimmers. They rely on their dorsal fin beating at 30-70 times per second to propel it along. Pectoral fins either side of the head help with stability and steering. Their tails are prehensile; that is they are specially adapted for grasping. To avoid being swept away by the current they wrap their tails around nearby vegetation.

The seahorse escapes the attention of predators by developing long skin filaments and camouflage colouration to match the marine weed in which it lives.  Within a matter of seconds it can change from grey or black to bright orange, vivid yellow or even deep plum.
In seahorses it is the male who takes on the responsibility of pregnancy.  This allows the females to make more eggs straight away without the need to nurture the last batch.  In a reverse of roles, because the male limits the rate of reproduction, the females compete with each other for the attention of the males.

After a long and noisy courtship (several days of posturing, colour changing and clicking to each other) the female releases her eggs into a special pouch on the male’s abdomen.  She leaves the male to fertilise the eggs as they embed into the spongy tissue of the pouch wall.  The male creates a special fluid to nourish the developing embryos and after gestation, he releases the free-swimming young into the sea.  The babies are born as perfect miniatures of their parents.  By the time they are two months old, they have grown to 5 cm.

Seahorses feed constantly.  They feed on plankton and other tiny prey. Seahorses can move their eyes independently and so can follow the activity of passing tiny sea life without giving their presence away.  When they judge that their prey is within range they quickly snap it up or suck it in from as much as 3 cm away.

Wednesday 5 December 2012

CHOCOLATE CHEESECAKE


This chocolate cheesecake recipe is yummy and indulgent. It is a well loved dessert that impresses both chocolate and cheesecake lovers. 

Ingredients
Base:
15 digestive biscuits 
50 g butter 
1 tablespoon cocoa powder

For the filling:
250 g mascarpone cheese 
200 g cream cheese 
300 g milk chocolate
100 g dark chocolate
3 oz caster sugar 


Glaze:
75 g dark chocolate, finely chopped
125 ml double cream
1 teaspoon golden syrup

Method 
Preheat the oven to gas mark 4/180 c.

Crush the digestive biscuits to form fine crumbs. Melt the butter and add to the biscuit crumbs along with the cocoa powder .  Place the mixture into a cake tin and push down firmly with the back of a spoon.  Place in the fridge to chill for 30 minutes.

Melt the milk chocolate in a bowl over a saucepan of water.  Place the mascarpone cheese, cream cheese and sugar into a bowl and mix thoroughly with a wooden spoon.  Mix the chocolate into the cheesecake mix.
Melt the dark chocolate and swirl into the mix.

Pour the cheesecake mix onto the base and place in fridge for at least 4 hours to set, ideally leave overnight.

To make the chocolate glaze, melt the chopped chocolate, cream and syrup over a gently heat and then whisk to a smooth sauce.  Allow to cool then swirl over the cheesecake.

For related articles click onto: